




PI Vision manual data entry
A practical guide to entering, reviewing, and correcting PI data in AVEVA PI Vision with Manual Data Entry+, Manual Input Table+, and Quick Input+.
Start with the workflow
Choose the control that matches the job
Manual entry is not one workflow. A laboratory result, a correction to a historical record, and a frequent operator adjustment each need a different balance of context, speed, and review. Vision Library+ provides several controls so the display can match the way the work is performed.
Manual Data Entry+
Best for deliberate entry of one value at a time. Use it when the operator needs a focused form with a clear target, timestamp, and confirmation step.
Manual Input Table+
Best for reviewing or editing several values in context. Use it for historical corrections, row-level review, and controlled CSV-based bulk import.
Quick Input+
Best for frequent adjustments where a switch, slider, or step input is faster than a full form. Use it when the target and allowed value range are already clear.
Before you write
Prepare a safe PI System write workflow
Manual data entry writes into the PI System, so treat it as an operational workflow rather than a cosmetic dashboard feature. Confirm the data model, permissions, units, timestamp behavior, and review expectations before adding a control to a production display.
Write only what the workflow owns. A display should make the target PI Point or AF Attribute, expected data type, time range, and confirmation behavior clear to the person entering the value.
Confirm the target
Identify the PI Point or AF Attribute that should receive the value. Check the engineering unit, point type, naming, and whether the target is a current-value workflow or a historical correction.
Confirm the write path
Verify that PI Web API, authentication, CORS or the approved same-origin gateway, and the Vision Library+ configuration are working. The signed-in user or service identity must have the required PI permissions.
Define validation
Set sensible limits and required fields. Decide how the display should handle bad input, digital states, duplicate timestamps, time zones, and a failed write.
Test with a non-critical target
Use a test PI Point or AF Attribute first. Verify the value, timestamp, quality, and downstream display behavior before allowing the workflow to write to production data.
Focused single-value entry
Use Manual Data Entry+ for deliberate updates
Manual Data Entry+ is suited to a form-led workflow where the operator needs to see the target, enter a value, and confirm the write. It is useful for laboratory results, inspection readings, maintenance records, and other values that are not collected automatically.
Add the control to the display
Open the target PI Vision display and add Manual Data Entry+ from Vision Library+. Place it near the process context or instructions that explain what the operator is recording.
Configure the target
Select the PI Point or AF Attribute that should receive the value. Confirm the data type, unit, and write permissions before moving to the input step.
Enter and validate the value
Enter the value and timestamp requested by the workflow. Check the displayed target and validation feedback, then correct the input before submitting if the value is outside the expected range.
Confirm the result
After the write completes, refresh the relevant value or trend and confirm that the timestamp, value, and quality are correct. A successful button click is not a substitute for checking the stored result.

Review and bulk correction
Use Manual Input Table+ when context matters
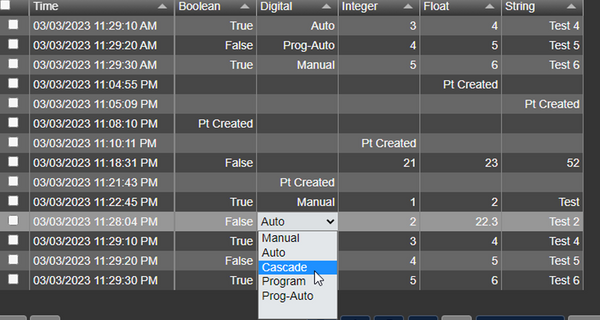
Manual Input Table+ is designed for workflows where users need to see several records together. It can support editing, deleting, adding, and controlled CSV import, but the wider surface makes review discipline especially important.
Select the target points and time range
Configure the table with the PI Points or AF Attributes and time range that the workflow owns. Keep the initial view focused enough that a user can recognize an incorrect row.
Review the existing data
Before editing, compare the current value, timestamp, quality, and surrounding records. Use the table for context, not as a reason to overwrite values without understanding their origin.
Edit or add values deliberately
Change only the intended cell or row. For historical corrections, verify the timestamp and unit as carefully as the value itself, then save and confirm the result.
Use CSV import as a controlled operation
Validate the file structure, target points, timestamps, decimal conventions, and expected row count before importing. Start with a small test file and review the resulting records after the write.
Fast operator adjustments
Use Quick Input+ for frequent, bounded changes
Quick Input+ adapts its interaction to the underlying data type. A boolean target may use a switch or button, while a numeric target may use a slider or step input. This makes it useful when the operator already understands the target and needs a quick, repeatable adjustment.
Good fit
Operator acknowledgements, bounded set-point adjustments, status changes, and other workflows where the allowed values and target are obvious.
Use caution
Unbounded free-form entry, high-impact process changes, or targets that require extensive historical context. Use a more deliberate form or table when review matters more than speed.

When a write does not behave as expected
Troubleshoot by symptom
| Symptom | Likely area to check | First useful test |
|---|---|---|
| The control loads but cannot write | Authentication, PI permissions, PI Web API configuration, or the configured target | Test the same target with a permitted test user and inspect the browser or PI Web API response. |
| The value appears to write but does not change | Wrong point, AF reference, timestamp, or refresh behavior | Read the target directly and compare the stored timestamp and value with the submitted data. |
| Only some table rows fail | Mixed point types, permissions, units, or malformed CSV rows | Reduce the import to one known-good row, then add rows gradually. |
| Quick Input shows the wrong interaction | Point type or symbol configuration | Confirm the selected target's data type and reload the symbol after changing the source. |
| Values have the wrong time | Browser time zone, server time zone, or timestamp interpretation | Test one known timestamp and document whether the workflow uses local time or UTC. |
Common questions
Manual PI data entry FAQ
Which control should I use for one manual value? +
Use Manual Data Entry+ when the operator should complete a focused form with a clear target, timestamp, validation step, and confirmation.
Can Manual Input Table+ import CSV data? +
It can support bulk import workflows. Validate the file structure, targets, timestamps, units, and row count before importing, then review the stored records after the write.
Does manual entry require PI Web API? +
The exact path depends on the deployed symbol and authentication design, but these Vision Library+ workflows need a working, authorized connection to the PI System. Confirm the configured PI Web API or approved gateway path before troubleshooting the symbol itself.
How can I reduce the risk of incorrect writes? +
Use least-privilege permissions, clear target labels, sensible validation, a non-critical test point, and a post-write verification step. For higher-impact workflows, add a review or approval process around the display.


