



PI Nexus+ / Installation and Administration
6. Run the Installer
Installer file:
Overview
Installer file:
PI-Nexus-Setup-1.4.3.exeRun the installer as administrator. The installer copies PI Nexus+ files, configures IIS, creates or updates the scanner service, creates shortcuts, installs admin helper scripts, and opens the database setup window at the end if that option is selected.
Steps:
- Start
PI-Nexus-Setup-1.4.3.exe. - Accept the license agreement.
- Choose the installation folder.
- Enter the PI Nexus+ service account in qualified format, for example
DOMAIN\svc-pinexus. - Enter the service account password.
- Enter the SQL Server and database name that PI Nexus+ should use:
- SQL Server name.
- Database name, usually
PINexus.
- Complete the installation.
- On the final page, leave
Run PI Nexus+ Database Setup nowchecked unless the database has already been configured. - Click Finish.
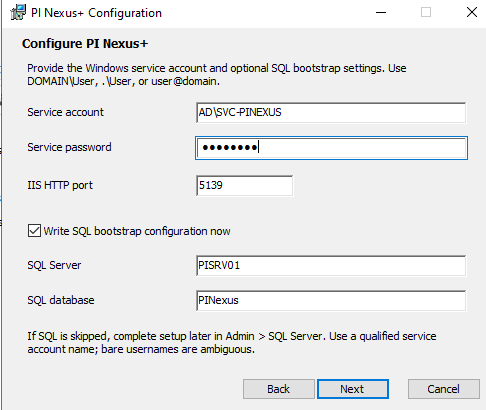
The installer checks that the service account name is qualified and can resolve to a Windows security identifier. It then tries to assign that account to the IIS app pool and scanner service.
If the installer warns that the account could not be assigned, finish the installation but do not continue to scans. Fix the service account name, password, or Windows logon rights, then update the IIS app pool and scanner service identities before first use.
A good result for this section is that installation finishes successfully and the database setup window opens.



